多线程与反射 前面我们已经讲解了JavaSE的大部分核心内容,最后一章,我们还将继续学习JavaSE中提供的各种高级特性。这些高级特性对于我们之后的学习,会有着举足轻重的作用。
多线程 注意: 本章节会涉及到 操作系统 相关知识。
在了解多线程之前,让我们回顾一下操作系统中提到的进程概念:
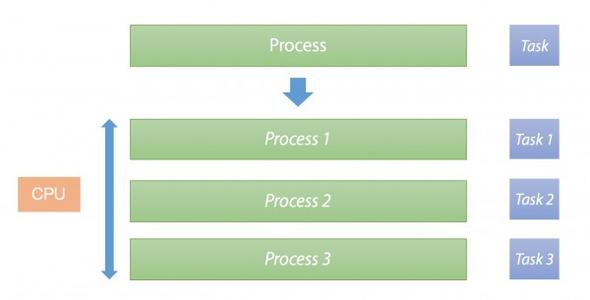
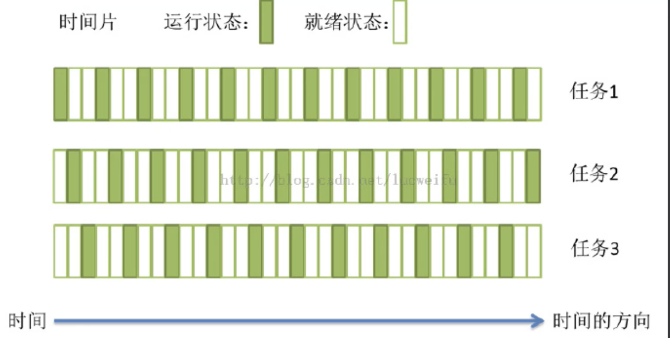
进程是程序执行的实体,每一个进程都是一个应用程序(比如我们运行QQ、浏览器、LOL、网易云音乐等软件),都有自己的内存空间,CPU一个核心同时只能处理一件事情,当出现多个进程需要同时运行时,CPU一般通过时间片轮转调度算法,来实现多个进程的同时运行。
在早期的计算机中,进程是拥有资源和独立运行的最小单位,也是程序执行的最小单位。但是,如果我希望两个任务同时进行,就必须运行两个进程,由于每个进程都有一个自己的内存空间,进程之间的通信就变得非常麻烦(比如要共享某些数据)而且执行不同进程会产生上下文切换,非常耗时,那么能否实现在一个进程中就能够执行多个任务呢?
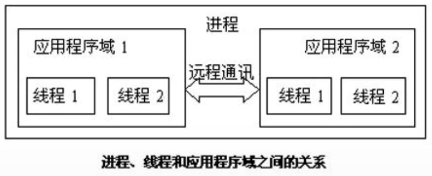
后来,线程横空出世,一个进程可以有多个线程,线程是程序执行中一个单一的顺序控制流程,现在线程才是程序执行流的最小单元,各个线程之间共享程序的内存空间(也就是所在进程的内存空间),上下文切换速度也高于进程。
在Java中,我们从开始,一直以来编写的都是单线程应用程序(运行main()方法的内容),也就是说只能同时执行一个任务(无论你是调用方法、还是进行计算,始终都是依次进行的,也就是同步的),而如果我们希望同时执行多个任务(两个方法同时 在运行或者是两个计算同时在进行,也就是异步的),就需要用到Java多线程框架。实际上一个Java程序启动后,会创建很多线程,不仅仅只运行一个主线程:
1
2
3
4
5
6
7
8
public static void main (String[] args) { ThreadMXBean bean = ManagementFactory.getThreadMXBean(); long [] ids = bean.getAllThreadIds(); ThreadInfo[] infos = bean.getThreadInfo(ids); for (ThreadInfo info : infos) { System.out.println(info.getThreadName()); } }
关于除了main线程默认以外的线程,涉及到JVM相关底层原理,在这里不做讲解,了解就行。
线程的创建和启动 通过创建Thread对象来创建一个新的线程,Thread构造方法中需要传入一个Runnable接口的实现(其实就是编写要在另一个线程执行的内容逻辑)同时Runnable只有一个未实现方法,因此可以直接使用lambda表达式:
1
2
3
4
5
6
7
8
9
10
11
12
13
14
15
@FunctionalInterface public interface Runnable { public abstract void run () ; }
创建好后,通过调用start()方法来运行此线程:
1
2
3
4
5
6
public static void main (String[] args) { Thread t = new Thread (() -> { System.out.println("我是另一个线程!" ); }); t.start(); }
可能上面的例子看起来和普通的单线程没两样,那我们先来看看下面这段代码的运行结果:
1
2
3
4
5
6
7
8
9
10
11
12
13
public static void main (String[] args) { Thread t = new Thread (() -> { System.out.println("我是线程:" +Thread.currentThread().getName()); System.out.println("我正在计算 0-10000 之间所有数的和..." ); int sum = 0 ; for (int i = 0 ; i <= 10000 ; i++) { sum += i; } System.out.println("结果:" +sum); }); t.start(); System.out.println("我是主线程!" ); }
我们发现,这段代码执行输出结果并不是按照从上往下的顺序了,因为他们分别位于两个线程,他们是同时进行的!如果你还是觉得很疑惑,我们接着来看下面的代码运行结果:
1
2
3
4
5
6
7
8
9
10
11
12
13
14
public static void main (String[] args) { Thread t1 = new Thread (() -> { for (int i = 0 ; i < 50 ; i++) { System.out.println("我是一号线程:" +i); } }); Thread t2 = new Thread (() -> { for (int i = 0 ; i < 50 ; i++) { System.out.println("我是二号线程:" +i); } }); t1.start(); t2.start(); }
我们可以看到打印实际上是在交替进行的,也证明了他们是在同时运行!
注意 :我们发现还有一个run方法,也能执行线程里面定义的内容,但是run是直接在当前线程执行,并不是创建一个线程执行!
实际上,线程和进程差不多,也会等待获取CPU资源,一旦获取到,就开始按顺序执行我们给定的程序,当需要等待外部IO操作(比如Scanner获取输入的文本),就会暂时处于休眠状态,等待通知,或是调用sleep()方法来让当前线程休眠一段时间:
1
2
3
4
5
6
7
8
9
public static void main (String[] args) throws InterruptedException { System.out.println("l" ); Thread.sleep(1000 ); System.out.println("b" ); Thread.sleep(1000 ); System.out.println("w" ); Thread.sleep(1000 ); System.out.println("nb!" ); }
我们也可以使用stop()方法来强行终止此线程:
1
2
3
4
5
6
7
8
9
10
public static void main (String[] args) throws InterruptedException { Thread t = new Thread (() -> { Thread me = Thread.currentThread(); for (int i = 0 ; i < 50 ; i++) { System.out.println("打印:" +i); if (i == 20 ) me.stop(); } }); t.start(); }
虽然stop()方法能够终止此线程,但是并不是所推荐的做法,有关线程中断相关问题,我们会在后面继续了解。
思考 :猜猜以下程序输出结果:
1
2
3
4
5
6
7
8
9
10
11
12
13
14
15
16
private static int value = 0 ;public static void main (String[] args) throws InterruptedException { Thread t1 = new Thread (() -> { for (int i = 0 ; i < 10000 ; i++) value++; System.out.println("线程1完成" ); }); Thread t2 = new Thread (() -> { for (int i = 0 ; i < 10000 ; i++) value++; System.out.println("线程2完成" ); }); t1.start(); t2.start(); Thread.sleep(1000 ); System.out.println(value); }
我们发现,value最后的值并不是我们理想的结果,有关为什么会出现这种问题,在我们学习到线程锁的时候,再来探讨。
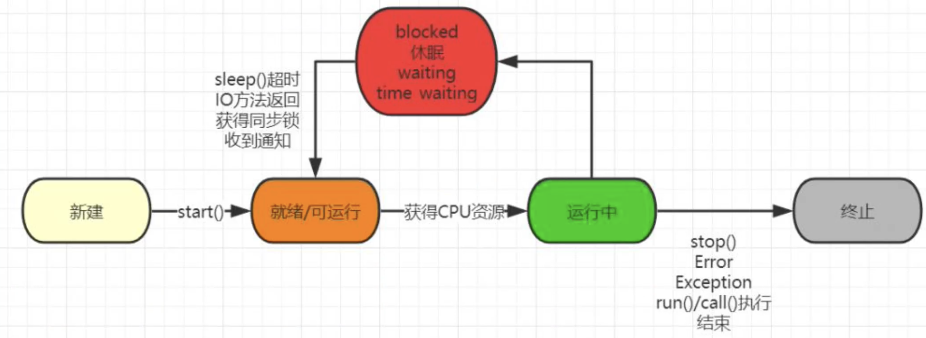
线程的休眠和中断 我们前面提到,一个线程处于运行状态下,线程的下一个状态会出现以下情况:
当CPU给予的运行时间结束时,会从运行状态回到就绪(可运行)状态,等待下一次获得CPU资源。
当线程进入休眠 / 阻塞(如等待IO请求) / 手动调用wait()方法时,会使得线程处于等待状态,当等待状态结束后会回到就绪状态。
当线程出现异常或错误 / 被stop() 方法强行停止 / 所有代码执行结束时,会使得线程的运行终止。
而这个部分我们着重了解一下线程的休眠和中断,首先我们来了解一下如何使得线程进如休眠状态:
1
2
3
4
5
6
7
8
9
10
11
12
public static void main (String[] args) { Thread t = new Thread (() -> { try { System.out.println("l" ); Thread.sleep(1000 ); System.out.println("b" ); } catch (InterruptedException e) { e.printStackTrace(); } }); t.start(); }
通过调用sleep()方法来将当前线程进入休眠,使得线程处于等待状态一段时间。我们发现,此方法显示声明了会抛出一个InterruptedException异常,那么这个异常在什么时候会发生呢?
1
2
3
4
5
6
7
8
9
10
11
12
13
14
15
16
public static void main (String[] args) { Thread t = new Thread (() -> { try { Thread.sleep(10000 ); } catch (InterruptedException e) { e.printStackTrace(); } }); t.start(); try { Thread.sleep(3000 ); t.interrupt(); } catch (InterruptedException e) { e.printStackTrace(); } }
我们发现,每一个Thread对象中,都有一个interrupt()方法,调用此方法后,会给指定线程添加一个中断标记以告知线程需要立即停止运行或是进行其他操作,由线程来响应此中断并进行相应的处理,我们前面提到的stop()方法是强制终止线程,这样的做法虽然简单粗暴,但是很有可能导致资源不能完全释放,而类似这样的发送通知来告知线程需要中断,让线程自行处理后续,会更加合理一些,也是更加推荐的做法。我们来看看interrupt的用法:
1
2
3
4
5
6
7
8
9
10
11
12
13
14
15
16
17
18
public static void main (String[] args) { Thread t = new Thread (() -> { System.out.println("线程开始运行!" ); while (true ){ if (Thread.currentThread().isInterrupted()){ break ; } } System.out.println("线程被中断了!" ); }); t.start(); try { Thread.sleep(3000 ); t.interrupt(); } catch (InterruptedException e) { e.printStackTrace(); } }
通过isInterrupted()可以判断线程是否存在中断标志,如果存在,说明外部希望当前线程立即停止,也有可能是给当前线程发送一个其他的信号,如果我们并不是希望收到中断信号就是结束程序,而是通知程序做其他事情,我们可以在收到中断信号后,复位中断标记,然后继续做我们的事情:
1
2
3
4
5
6
7
8
9
10
11
12
13
14
15
16
17
18
public static void main (String[] args) { Thread t = new Thread (() -> { System.out.println("线程开始运行!" ); while (true ){ if (Thread.currentThread().isInterrupted()){ System.out.println("发现中断信号,复位,继续运行..." ); Thread.interrupted(); } } }); t.start(); try { Thread.sleep(3000 ); t.interrupt(); } catch (InterruptedException e) { e.printStackTrace(); } }
复位中断标记后,会立即清除中断标记。那么,如果现在我们想暂停线程呢?我们希望线程暂时停下,比如等待其他线程执行完成后,再继续运行,那这样的操作怎么实现呢?
1
2
3
4
5
6
7
8
9
10
11
12
13
14
public static void main (String[] args) { Thread t = new Thread (() -> { System.out.println("线程开始运行!" ); Thread.currentThread().suspend(); System.out.println("线程继续运行!" ); }); t.start(); try { Thread.sleep(3000 ); t.resume(); } catch (InterruptedException e) { e.printStackTrace(); } }
虽然这样很方便地控制了线程的暂停状态,但是这两个方法我们发现实际上也是不推荐的做法,它很容易导致死锁!有关为什么被弃用的原因,我们会在线程锁继续探讨。
线程的优先级 实际上,Java程序中的每个线程并不是平均分配CPU时间的,为了使得线程资源分配更加合理,Java采用的是抢占式调度方式,优先级越高的线程,优先使用CPU资源!我们希望CPU花费更多的时间去处理更重要的任务,而不太重要的任务,则可以先让出一部分资源。线程的优先级一般分为以下三种:
MIN_PRIORITY 最低优先级
MAX_PRIORITY 最高优先级
NOM_PRIORITY 常规优先级
1
2
3
4
5
6
7
public static void main (String[] args) { Thread t = new Thread (() -> { System.out.println("线程开始运行!" ); }); t.start(); t.setPriority(Thread.MIN_PRIORITY); }
优先级越高的线程,获得CPU资源的概率会越大,并不是说一定优先级越高的线程越先执行!
线程的礼让和加入 我们还可以在当前线程的工作不重要时,将CPU资源让位给其他线程,通过使用yield()方法来将当前资源让位给其他同优先级线程:
1
2
3
4
5
6
7
8
9
10
11
12
13
14
15
16
17
18
19
20
21
public static void main (String[] args) { Thread t1 = new Thread (() -> { System.out.println("线程1开始运行!" ); for (int i = 0 ; i < 50 ; i++) { if (i % 5 == 0 ) { System.out.println("让位!" ); Thread.yield (); } System.out.println("1打印:" +i); } System.out.println("线程1结束!" ); }); Thread t2 = new Thread (() -> { System.out.println("线程2开始运行!" ); for (int i = 0 ; i < 50 ; i++) { System.out.println("2打印:" +i); } }); t1.start(); t2.start(); }
观察结果,我们发现,在让位之后,尽可能多的在执行线程2的内容。
当我们希望一个线程等待另一个线程执行完成后再继续进行,我们可以使用join()方法来实现线程的加入:
1
2
3
4
5
6
7
8
9
10
11
12
13
14
15
16
17
18
19
20
21
22
23
24
25
public static void main (String[] args) { Thread t1 = new Thread (() -> { System.out.println("线程1开始运行!" ); for (int i = 0 ; i < 50 ; i++) { System.out.println("1打印:" +i); } System.out.println("线程1结束!" ); }); Thread t2 = new Thread (() -> { System.out.println("线程2开始运行!" ); for (int i = 0 ; i < 50 ; i++) { System.out.println("2打印:" +i); if (i == 10 ){ try { System.out.println("线程1加入到此线程!" ); t1.join(); } catch (InterruptedException e) { e.printStackTrace(); } } } }); t1.start(); t2.start(); }
我们发现,线程1加入后,线程2等待线程1待执行的内容全部执行完成之后,再继续执行的线程2内容。注意,线程的加入只是等待另一个线程的完成,并不是将另一个线程和当前线程合并!我们来看看:
1
2
3
4
5
6
7
8
9
10
11
12
13
14
15
16
17
18
19
20
21
22
23
24
25
public static void main (String[] args) { Thread t1 = new Thread (() -> { System.out.println(Thread.currentThread().getName()+"开始运行!" ); for (int i = 0 ; i < 50 ; i++) { System.out.println(Thread.currentThread().getName()+"打印:" +i); } System.out.println("线程1结束!" ); }); Thread t2 = new Thread (() -> { System.out.println("线程2开始运行!" ); for (int i = 0 ; i < 50 ; i++) { System.out.println("2打印:" +i); if (i == 10 ){ try { System.out.println("线程1加入到此线程!" ); t1.join(); } catch (InterruptedException e) { e.printStackTrace(); } } } }); t1.start(); t2.start(); }
实际上,t2线程只是暂时处于等待状态,当t1执行结束时,t2才开始继续执行,只是在效果上看起来好像是两个线程合并为一个线程在执行而已。
线程锁和线程同步 在开始讲解线程同步之前,我们需要先了解一下多线程情况下Java的内存管理:
线程之间的共享变量(比如之前悬念中的value变量)存储在主内存(main memory)中,每个线程都有一个私有的工作内存(本地内存),工作内存中存储了该线程以读/写共享变量的副本。它类似于我们在计算机组成原理中学习的多核心处理器高速缓存机制:
高速缓存通过保存内存中数据的副本来提供更加快速的数据访问,但是如果多个处理器的运算任务都涉及同一块内存区域,就可能导致各自的高速缓存数据不一致,在写回主内存时就会发生冲突,这就是引入高速缓存引发的新问题,称之为:缓存一致性。
实际上,Java的内存模型也是这样类似设计的,当我们同时去操作一个共享变量时,如果仅仅是读取还好,但是如果同时写入内容,就会出现问题!好比说一个银行,如果我和我的朋友同时在银行取我账户里面的钱,难道取1000还可能吐2000出来吗?我们需要一种更加安全的机制来维持秩序,保证数据的安全性!
比如我们可以来看看下面这个问题:
1
2
3
4
5
6
7
8
9
10
11
12
13
14
15
16
private static int value = 0 ;public static void main (String[] args) throws InterruptedException { Thread t1 = new Thread (() -> { for (int i = 0 ; i < 10000 ; i++) value++; System.out.println("线程1完成" ); }); Thread t2 = new Thread (() -> { for (int i = 0 ; i < 10000 ; i++) value++; System.out.println("线程2完成" ); }); t1.start(); t2.start(); Thread.sleep(1000 ); System.out.println(value); }
实际上,当两个线程同时读取value的时候,可能会同时拿到同样的值,而进行自增操作之后,也是同样的值,再写回主内存后,本来应该进行2次自增操作,实际上只执行了一次!
通过synchronized关键字来创造一个线程锁,首先我们来认识一下synchronized代码块,它需要在括号中填入一个内容,必须是一个对象或是一个类,我们在value自增操作外套上同步代码块:
1
2
3
4
5
6
7
8
9
10
11
12
13
14
15
16
17
18
19
20
21
22
23
24
private static int value = 0 ;public static void main (String[] args) throws InterruptedException { Thread t1 = new Thread (() -> { for (int i = 0 ; i < 10000 ; i++) { synchronized (Main.class){ value++; } } System.out.println("线程1完成" ); }); Thread t2 = new Thread (() -> { for (int i = 0 ; i < 10000 ; i++) { synchronized (Main.class){ value++; } } System.out.println("线程2完成" ); }); t1.start(); t2.start(); Thread.sleep(1000 ); System.out.println(value); }
我们发现,现在得到的结果就是我们想要的内容了,因为在同步代码块执行过程中,拿到了我们传入对象或类的锁(传入的如果是对象,就是对象锁,不同的对象代表不同的对象锁,如果是类,就是类锁,类锁只有一个,实际上类锁也是对象锁,是Class类实例,但是Class类实例同样的类无论怎么获取都是同一个),但是注意两个线程必须使用同一把锁!
当一个线程进入到同步代码块时,会获取到当前的锁,而这时如果其他使用同样的锁的同步代码块也想执行内容,就必须等待当前同步代码块的内容执行完毕,在执行完毕后会自动释放这把锁,而其他的线程才能拿到这把锁并开始执行同步代码块里面的内容(实际上synchronized是一种悲观锁,随时都认为有其他线程在对数据进行修改,后面在JUC篇视频教程中我们还会讲到乐观锁,如CAS算法)
那么我们来看看,如果使用的是不同对象的锁,那么还能顺利进行吗?
1
2
3
4
5
6
7
8
9
10
11
12
13
14
15
16
17
18
19
20
21
22
23
24
25
26
private static int value = 0 ;public static void main (String[] args) throws InterruptedException { Main main1 = new Main (); Main main2 = new Main (); Thread t1 = new Thread (() -> { for (int i = 0 ; i < 10000 ; i++) { synchronized (main1){ value++; } } System.out.println("线程1完成" ); }); Thread t2 = new Thread (() -> { for (int i = 0 ; i < 10000 ; i++) { synchronized (main2){ value++; } } System.out.println("线程2完成" ); }); t1.start(); t2.start(); Thread.sleep(1000 ); System.out.println(value); }
当对象不同时,获取到的是不同的锁,因此并不能保证自增操作的原子性,最后也得不到我们想要的结果。
synchronized关键字也可以作用于方法上,调用此方法时也会获取锁:
1
2
3
4
5
6
7
8
9
10
11
12
13
14
15
16
17
18
19
20
private static int value = 0 ;private static synchronized void add () { value++; } public static void main (String[] args) throws InterruptedException { Thread t1 = new Thread (() -> { for (int i = 0 ; i < 10000 ; i++) add(); System.out.println("线程1完成" ); }); Thread t2 = new Thread (() -> { for (int i = 0 ; i < 10000 ; i++) add(); System.out.println("线程2完成" ); }); t1.start(); t2.start(); Thread.sleep(1000 ); System.out.println(value); }
我们发现实际上效果是相同的,只不过这个锁不用你去给,如果是静态方法,就是使用的类锁,而如果是普通成员方法,就是使用的对象锁。通过灵活的使用synchronized就能很好地解决我们之前提到的问题了。
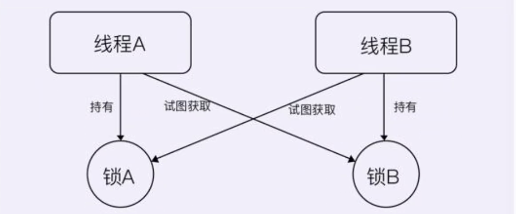
死锁 其实死锁的概念在操作系统中也有提及,它是指两个线程相互持有对方需要的锁,但是又迟迟不释放,导致程序卡住:
我们发现,线程A和线程B都需要对方的锁,但是又被对方牢牢把握,由于线程被无限期地阻塞,因此程序不可能正常终止。我们来看看以下这段代码会得到什么结果:
1
2
3
4
5
6
7
8
9
10
11
12
13
14
15
16
17
18
19
20
21
22
23
24
25
26
27
28
29
30
public static void main (String[] args) throws InterruptedException { Object o1 = new Object (); Object o2 = new Object (); Thread t1 = new Thread (() -> { synchronized (o1){ try { Thread.sleep(1000 ); synchronized (o2){ System.out.println("线程1" ); } } catch (InterruptedException e) { e.printStackTrace(); } } }); Thread t2 = new Thread (() -> { synchronized (o2){ try { Thread.sleep(1000 ); synchronized (o1){ System.out.println("线程2" ); } } catch (InterruptedException e) { e.printStackTrace(); } } }); t1.start(); t2.start(); }
所以,我们在编写程序时,一定要注意,不要出现这种死锁的情况。那么我们如何去检测死锁呢?我们可以利用jstack命令来检测死锁,首先利用jps找到我们的java进程:
1
2
3
4
5
6
7
8
9
10
11
12
13
14
15
16
17
18
19
20
21
22
23
nagocoler@NagodeMacBook-Pro ~ % jps 51592 Launcher 51690 Jps 14955 51693 Main nagocoler@NagodeMacBook-Pro ~ % jstack 51693 ... Java stack information for the threads listed above: =================================================== "Thread-1": at com.test.Main.lambda$main$1(Main.java:46) - waiting to lock <0x000000076ad27fc0> (a java.lang.Object) - locked <0x000000076ad27fd0> (a java.lang.Object) at com.test.Main$$Lambda$2/1867750575.run(Unknown Source) at java.lang.Thread.run(Thread.java:748) "Thread-0": at com.test.Main.lambda$main$0(Main.java:34) - waiting to lock <0x000000076ad27fd0> (a java.lang.Object) - locked <0x000000076ad27fc0> (a java.lang.Object) at com.test.Main$$Lambda$1/396873410.run(Unknown Source) at java.lang.Thread.run(Thread.java:748) Found 1 deadlock.
jstack自动帮助我们找到了一个死锁,并打印出了相关线程的栈追踪信息,同样的,使用jconsole也可以进行监测。
因此,前面说不推荐使用 suspend()去挂起线程的原因,是因为suspend()在使线程暂停的同时,并不会去释放任何锁资源。其他线程都无法访问被它占用的锁。直到对应的线程执行resume()方法后,被挂起的线程才能继续,从而其它被阻塞在这个锁的线程才可以继续执行。但是,如果resume()操作出现在suspend()之前执行,那么线程将一直处于挂起状态,同时一直占用锁,这就产生了死锁。
wait和notify方法 其实我们之前可能就发现了,Object类还有三个方法我们从来没有使用过,分别是wait()、notify()以及notifyAll(),他们其实是需要配合synchronized来使用的(实际上锁就是依附于对象存在的,每个对象都应该有针对于锁的一些操作,所以说就这样设计了)当然,只有在同步代码块中才能使用这些方法,正常情况下会报错,我们来看看他们的作用是什么:
1
2
3
4
5
6
7
8
9
10
11
12
13
14
15
16
17
18
19
20
21
22
23
24
25
26
27
public static void main (String[] args) throws InterruptedException { Object o1 = new Object (); Thread t1 = new Thread (() -> { synchronized (o1){ try { System.out.println("开始等待" ); o1.wait(); System.out.println("等待结束!" ); } catch (InterruptedException e) { e.printStackTrace(); } } }); Thread t2 = new Thread (() -> { synchronized (o1){ System.out.println("开始唤醒!" ); o1.notify(); for (int i = 0 ; i < 50 ; i++) { System.out.println(i); } } }); t1.start(); Thread.sleep(1000 ); t2.start(); }
我们可以发现,对象的wait()方法会暂时使得此线程进入等待状态,同时会释放当前代码块持有的锁,这时其他线程可以获取到此对象的锁,当其他线程调用对象的notify()方法后,会唤醒刚才变成等待状态的线程(这时并没有立即释放锁)。注意,必须是在持有锁(同步代码块内部)的情况下使用,否则会抛出异常!
notifyAll其实和notify一样,也是用于唤醒,但是前者是唤醒所有调用wait()后处于等待的线程,而后者是看运气随机选择一个。
ThreadLocal的使用 既然每个线程都有一个自己的工作内存,那么能否只在自己的工作内存中创建变量仅供线程自己使用呢?
我们可以使用ThreadLocal类,来创建工作内存中的变量,它将我们的变量值存储在内部(只能存储一个变量),不同的线程访问到ThreadLocal对象时,都只能获取到当前线程所属的变量。
1
2
3
4
5
6
7
8
9
10
11
12
13
14
public static void main (String[] args) throws InterruptedException { ThreadLocal<String> local = new ThreadLocal <>(); Thread t1 = new Thread (() -> { local.set("lbwnb" ); System.out.println("变量值已设定!" ); System.out.println(local.get()); }); Thread t2 = new Thread (() -> { System.out.println(local.get()); }); t1.start(); Thread.sleep(3000 ); t2.start(); }
上面的例子中,我们开启两个线程分别去访问ThreadLocal对象,我们发现,第一个线程存放的内容,第一个线程可以获取,但是第二个线程无法获取,我们再来看看第一个线程存入后,第二个线程也存放,是否会覆盖第一个线程存放的内容:
1
2
3
4
5
6
7
8
9
10
11
12
13
14
15
16
17
18
19
20
21
public static void main (String[] args) throws InterruptedException { ThreadLocal<String> local = new ThreadLocal <>(); Thread t1 = new Thread (() -> { local.set("lbwnb" ); System.out.println("线程1变量值已设定!" ); try { Thread.sleep(2000 ); } catch (InterruptedException e) { e.printStackTrace(); } System.out.println("线程1读取变量值:" ); System.out.println(local.get()); }); Thread t2 = new Thread (() -> { local.set("yyds" ); System.out.println("线程2变量值已设定!" ); }); t1.start(); Thread.sleep(1000 ); t2.start(); }
我们发现,即使线程2重新设定了值,也没有影响到线程1存放的值,所以说,不同线程向ThreadLocal存放数据,只会存放在线程自己的工作空间中,而不会直接存放到主内存中,因此各个线程直接存放的内容互不干扰。
我们发现在线程中创建的子线程,无法获得父线程工作内存中的变量:
1
2
3
4
5
6
7
8
9
10
public static void main (String[] args) { ThreadLocal<String> local = new ThreadLocal <>(); Thread t = new Thread (() -> { local.set("lbwnb" ); new Thread (() -> { System.out.println(local.get()); }).start(); }); t.start(); }
我们可以使用InheritableThreadLocal来解决:
1
2
3
4
5
6
7
8
9
10
public static void main (String[] args) { ThreadLocal<String> local = new InheritableThreadLocal <>(); Thread t = new Thread (() -> { local.set("lbwnb" ); new Thread (() -> { System.out.println(local.get()); }).start(); }); t.start(); }
在InheritableThreadLocal存放的内容,会自动向子线程传递。
定时器 我们有时候会有这样的需求,我希望定时执行任务,比如3秒后执行,其实我们可以通过使用Thread.sleep()来实现:
1
2
3
4
5
6
7
8
9
10
11
12
13
14
15
16
17
18
19
20
21
22
23
24
public static void main (String[] args) { new TimerTask (() -> System.out.println("我是定时任务!" ), 3000 ).start(); } static class TimerTask { Runnable task; long time; public TimerTask (Runnable runnable, long time) { this .task = runnable; this .time = time; } public void start () { new Thread (() -> { try { Thread.sleep(time); task.run(); } catch (InterruptedException e) { e.printStackTrace(); } }).start(); } }
我们通过自行封装一个TimerTask类,并在启动时,先休眠3秒钟,再执行我们传入的内容。那么现在我们希望,能否循环执行一个任务呢?比如我希望每隔1秒钟执行一次代码,这样该怎么做呢?
1
2
3
4
5
6
7
8
9
10
11
12
13
14
15
16
17
18
19
20
21
22
23
24
25
26
public static void main (String[] args) { new TimerLoopTask (() -> System.out.println("我是定时任务!" ), 3000 ).start(); } static class TimerLoopTask { Runnable task; long loopTime; public TimerLoopTask (Runnable runnable, long loopTime) { this .task = runnable; this .loopTime = loopTime; } public void start () { new Thread (() -> { try { while (true ){ Thread.sleep(loopTime); task.run(); } } catch (InterruptedException e) { e.printStackTrace(); } }).start(); } }
现在我们将单次执行放入到一个无限循环中,这样就能一直执行了,并且按照我们的间隔时间进行。
但是终究是我们自己实现,可能很多方面还没考虑到,Java也为我们提供了一套自己的框架用于处理定时任务:
1
2
3
4
5
6
7
8
9
public static void main (String[] args) { Timer timer = new Timer (); timer.schedule(new TimerTask () { @Override public void run () { System.out.println(Thread.currentThread().getName()); } }, 1000 ); }
我们可以通过创建一个Timer类来让它进行定时任务调度,我们可以通过此对象来创建任意类型的定时任务,包延时任务、循环定时任务等。我们发现,虽然任务执行完成了,但是我们的程序并没有停止,这是因为Timer内存维护了一个任务队列和一个工作线程:
1
2
3
4
5
6
7
8
9
10
11
12
13
14
15
16
public class Timer { private final TaskQueue queue = new TaskQueue (); private final TimerThread thread = new TimerThread (queue); ... }
TimerThread继承自Thread,是一个新创建的线程,在构造时自动启动:
1
2
3
4
public Timer (String name) { thread.setName(name); thread.start(); }
而它的run方法会循环地读取队列中是否还有任务,如果有任务依次执行,没有的话就暂时处于休眠状态:
1
2
3
4
5
6
7
8
9
10
11
12
13
14
15
16
17
18
19
20
21
22
23
24
25
26
27
public void run () { try { mainLoop(); } finally { synchronized (queue) { newTasksMayBeScheduled = false ; queue.clear(); } } } private void mainLoop () { try { TimerTask task; boolean taskFired; synchronized (queue) { while (queue.isEmpty() && newTasksMayBeScheduled) queue.wait(); if (queue.isEmpty()) break ; ... }
newTasksMayBeScheduled实际上就是标记当前定时器是否关闭,当它为false时,表示已经不会再有新的任务到来,也就是关闭,我们可以通过调用cancel()方法来关闭它的工作线程:
1
2
3
4
5
6
7
public void cancel () { synchronized (queue) { thread.newTasksMayBeScheduled = false ; queue.clear(); queue.notify(); } }
因此,我们可以在使用完成后,调用Timer的cancel()方法以正常退出我们的程序:
1
2
3
4
5
6
7
8
9
10
public static void main (String[] args) { Timer timer = new Timer (); timer.schedule(new TimerTask () { @Override public void run () { System.out.println(Thread.currentThread().getName()); timer.cancel(); } }, 1000 ); }
守护线程 不要把操作系统重的守护进程和守护线程相提并论!
守护进程在后台运行运行,不需要和用户交互,本质和普通进程类似。而守护线程就不一样了,当其他所有的非守护线程结束之后,守护线程自动结束,也就是说,Java中所有的线程都执行完毕后,守护线程自动结束,因此守护线程不适合进行IO操作,只适合打打杂:
1
2
3
4
5
6
7
8
9
10
11
12
13
14
15
16
17
public static void main (String[] args) throws InterruptedException{ Thread t = new Thread (() -> { while (true ){ try { System.out.println("程序正常运行中..." ); Thread.sleep(1000 ); } catch (InterruptedException e) { e.printStackTrace(); } } }); t.setDaemon(true ); t.start(); for (int i = 0 ; i < 5 ; i++) { Thread.sleep(1000 ); } }
在守护线程中产生的新线程也是守护的:
1
2
3
4
5
6
7
8
9
10
11
12
13
14
15
16
17
18
19
20
public static void main (String[] args) throws InterruptedException{ Thread t = new Thread (() -> { Thread it = new Thread (() -> { while (true ){ try { System.out.println("程序正常运行中..." ); Thread.sleep(1000 ); } catch (InterruptedException e) { e.printStackTrace(); } } }); it.start(); }); t.setDaemon(true ); t.start(); for (int i = 0 ; i < 5 ; i++) { Thread.sleep(1000 ); } }
再谈集合类 集合类中有一个东西是Java8新增的Spliterator接口,翻译过来就是:可拆分迭代器(Splitable Iterator)和Iterator一样,Spliterator也用于遍历数据源中的元素,但它是为了并行执行而设计的。Java 8已经为集合框架中包含的所有数据结构提供了一个默认的Spliterator实现。在集合跟接口Collection中提供了一个spliterator()方法用于获取可拆分迭代器。
其实我们之前在讲解集合类的根接口时,就发现有这样一个方法:
1
2
3
default Stream<E> parallelStream () { return StreamSupport.stream(spliterator(), true ); }
并行流,其实就是一个多线程执行的流,它通过默认的ForkJoinPool实现(这里不讲解原理),它可以提高你的多线程任务的速度。
1
2
3
4
5
6
public static void main (String[] args) { List<Integer> list = new ArrayList <>(Arrays.asList(1 , 4 , 5 , 2 , 9 , 3 , 6 , 0 )); list .parallelStream() .forEach(i -> System.out.println(Thread.currentThread().getName()+" -> " +i)); }
我们发现,forEach操作的顺序,并不是我们实际List中的顺序,同时每次打印也是不同的线程在执行!我们可以通过调用forEachOrdered()方法来使用单线程维持原本的顺序:
1
2
3
4
5
6
public static void main (String[] args) { List<Integer> list = new ArrayList <>(Arrays.asList(1 , 4 , 5 , 2 , 9 , 3 , 6 , 0 )); list .parallelStream() .forEachOrdered(System.out::println); }
我们之前还发现,在Arrays数组工具类中,也包含大量的并行方法:
1
2
3
4
5
public static void main (String[] args) { int [] arr = new int []{1 , 4 , 5 , 2 , 9 , 3 , 6 , 0 }; Arrays.parallelSort(arr); System.out.println(Arrays.toString(arr)); }
更多地使用并行方法,可以更加充分地发挥现代计算机多核心的优势,但是同时需要注意多线程产生的异步问题!
1
2
3
4
5
6
7
8
public static void main (String[] args) { int [] arr = new int []{1 , 4 , 5 , 2 , 9 , 3 , 6 , 0 }; Arrays.parallelSetAll(arr, i -> { System.out.println(Thread.currentThread().getName()); return arr[i]; }); System.out.println(Arrays.toString(arr)); }
因为多线程的加入,我们之前认识的集合类都废掉了:
1
2
3
4
5
6
7
8
9
10
11
12
13
14
15
public static void main (String[] args) throws InterruptedException { List<Integer> list = new ArrayList <>(); new Thread (() -> { for (int i = 0 ; i < 1000 ; i++) { list.add(i); } }).start(); new Thread (() -> { for (int i = 1000 ; i < 2000 ; i++) { list.add(i); } }).start(); Thread.sleep(2000 ); System.out.println(list.size()); }
我们发现,有些时候运气不好,得到的结果并不是2000个元素,而是:
因为之前的集合类,并没有考虑到多线程运行的情况,如果两个线程同时执行,那么有可能两个线程同一时间都执行同一个方法,这种情况下就很容易出问题:
1
2
3
4
5
public boolean add (E e) { ensureCapacityInternal(size + 1 ); elementData[size++] = e; return true ; }
当然,在Java早期的时候,还有一些老的集合类,这些集合类都是线程安全的:
1
2
3
4
5
6
7
8
9
10
11
12
13
14
15
16
17
public static void main (String[] args) throws InterruptedException { Vector<Integer> list = new Vector <>(); new Thread (() -> { for (int i = 0 ; i < 1000 ; i++) { list.add(i); } }).start(); new Thread (() -> { for (int i = 1000 ; i < 2000 ; i++) { list.add(i); } }).start(); Thread.sleep(1000 ); System.out.println(list.size()); }
因为这些集合类中的每一个方法都加了锁,所以说不会出现多线程问题,但是这些老的集合类现在已经不再使用了,我们会在JUC篇视频教程中介绍专用于并发编程的集合类。
通过对Java多线程的了解,我们就具备了利用多线程解决问题的思维!
实战:生产者与消费者 所谓的生产者消费者模型,是通过一个容器来解决生产者和消费者的强耦合问题。通俗的讲,就是生产者在不断的生产,消费者也在不断的消费,可是消费者消费的产品是生产者生产的,这就必然存在一个中间容器,我们可以把这个容器想象成是一个货架,当货架空的时候,生产者要生产产品,此时消费者在等待生产者往货架上生产产品,而当货架有货物的时候,消费者可以从货架上拿走商品,生产者此时等待货架出现空位,进而补货,这样不断的循环。
通过多线程编程,来模拟一个餐厅的2个厨师和3个顾客,假设厨师炒出一个菜的时间为3秒,顾客吃掉菜品的时间为4秒。
反射 注意: 本章节涉及到JVM相关底层原理,难度会有一些大。
反射就是把Java类中的各个成分映射成一个个的Java对象。即在运行状态中,对于任意一个类,都能够知道这个类所有的属性和方法,对于任意一个对象,都能调用它的任意一个方法和属性。这种动态获取信息及动态调用对象方法的功能叫Java的反射机制。
简而言之,我们可以通过反射机制,获取到类的一些属性,包括类里面有哪些字段,有哪些方法,继承自哪个类,甚至还能获取到泛型!它的权限非常高,慎重使用!
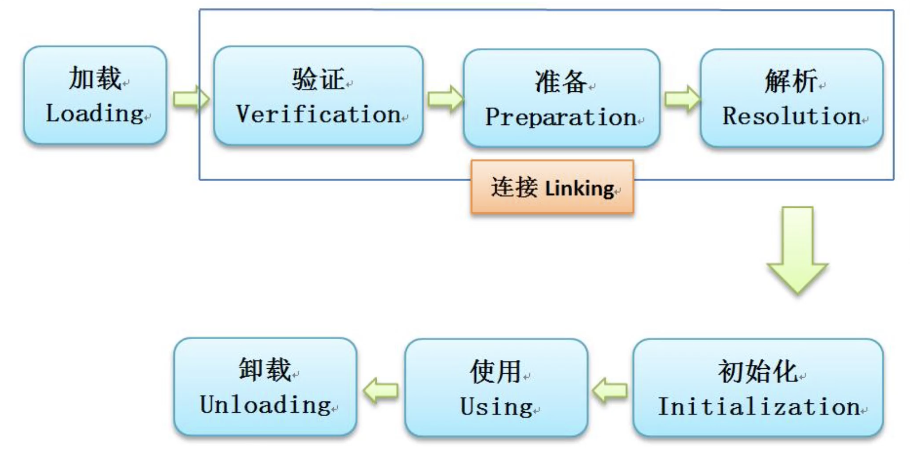
Java类加载机制 在学习Java的反射机制之前,我们需要先了解一下类的加载机制,一个类是如何被加载和使用的:
在Java程序启动时,JVM会将一部分类(class文件)先加载(并不是所有的类都会在一开始加载),通过ClassLoader将类加载,在加载过程中,会将类的信息提取出来(存放在元空间中,JDK1.8之前存放在永久代),同时也会生成一个Class对象存放在内存(堆内存),注意此Class对象只会存在一个,与加载的类唯一对应!
为了方便各位小伙伴理解,你们就直接理解为默认情况下(仅使用默认类加载器)每个类都有且只有一个唯一的Class对象存放在JVM中,我们无论通过什么方式访问,都是始终是那一个对象。Class对象中包含我们类的一些信息,包括类里面有哪些方法、哪些变量等等。
Class类详解 通过前面,我们了解了类的加载,同时会提取一个类的信息生成Class对象存放在内存中,而反射机制其实就是利用这些存放的类信息,来获取类的信息和操作类。那么如何获取到每个类对应的Class对象呢,我们可以通过以下方式:
1
2
3
4
5
public static void main (String[] args) throws ClassNotFoundException { Class<String> clazz = String.class; Class<?> clazz2 = Class.forName("java.lang.String" ); Class<?> clazz3 = new String ("cpdd" ).getClass(); }
注意Class类也是一个泛型类,只有第一种方法,能够直接获取到对应类型的Class对象,而以下两种方法使用了?通配符作为返回值,但是实际上都和第一个返回的是同一个对象:
1
2
3
4
5
6
Class<String> clazz = String.class; Class<?> clazz2 = Class.forName("java.lang.String" ); Class<?> clazz3 = new String ("cpdd" ).getClass(); System.out.println(clazz == clazz2); System.out.println(clazz == clazz3);
通过比较,验证了我们一开始的结论,在JVM中每个类始终只存在一个Class对象,无论通过什么方法获取,都是一样的。现在我们再来看看这个问题:
1
2
3
4
public static void main (String[] args) { Class<?> clazz = int .class; System.out.println(clazz); }
迷了,不是每个类才有Class对象吗,基本数据类型又不是类,这也行吗?实际上,基本数据类型也有对应的Class对象(反射操作可能需要用到),而且我们不仅可以通过class关键字获取,其实本质上是定义在对应的包装类中的:
1 2 3 4 5 6 7 8 9 10 11 12 13 14 @SuppressWarnings("unchecked") public static final Class<Integer> TYPE = (Class<Integer>) Class.getPrimitiveClass("int" );static native Class<?> getPrimitiveClass(String name);
每个包装类中(包括Void),都有一个获取原始类型Class方法,注意,getPrimitiveClass获取的是原始类型,并不是包装类型,只是可以使用包装类来表示。
1
2
3
4
public static void main (String[] args) { Class<?> clazz = int .class; System.out.println(Integer.TYPE == int .class); }
通过对比,我们发现实际上包装类型都有一个TYPE,其实也就是基本类型的Class,那么包装类的Class和基本类的Class一样吗?
1
2
3
public static void main (String[] args) { System.out.println(Integer.TYPE == Integer.class); }
我们发现,包装类型的Class对象并不是基本类型Class对象。数组类型也是一种类型,只是编程不可见,因此我们可以直接获取数组的Class对象:
1
2
3
4
5
6
7
8
public static void main (String[] args) { Class<String[]> clazz = String[].class; System.out.println(clazz.getName()); System.out.println(clazz.getSimpleName()); System.out.println(clazz.getTypeName()); System.out.println(clazz.getClassLoader()); System.out.println(clazz.cast(new Integer ("10" ))); }
下节课,我们将开始对Class对象的使用进行讲解。
Class对象与多态 正常情况下,我们使用instanceof进行类型比较:
1
2
3
4
public static void main (String[] args) { String str = "" ; System.out.println(str instanceof String); }
它可以判断一个对象是否为此接口或是类的实现或是子类,而现在我们有了更多的方式去判断类型:
1
2
3
4
public static void main (String[] args) { String str = "" ; System.out.println(str.getClass() == String.class); }
如果需要判断是否为子类或是接口/抽象类的实现,我们可以使用asSubClass()方法:
1
2
3
4
public static void main (String[] args) { Integer i = 10 ; i.getClass().asSubclass(Number.class); }
通过getSuperclass()方法,我们可以获取到父类的Class对象:
1
2
3
4
public static void main (String[] args) { Integer i = 10 ; System.out.println(i.getClass().getSuperclass()); }
也可以通过getGenericSuperclass()获取父类的原始类型的Type:
1
2
3
4
5
6
public static void main (String[] args) { Integer i = 10 ; Type type = i.getClass().getGenericSuperclass(); System.out.println(type); System.out.println(type instanceof Class); }
我们发现Type实际上是Class类的父接口,但是获取到的Type的实现并不一定是Class。
同理,我们也可以像上面这样获取父接口:
1
2
3
4
5
6
7
8
9
10
public static void main (String[] args) { Integer i = 10 ; for (Class<?> anInterface : i.getClass().getInterfaces()) { System.out.println(anInterface.getName()); } for (Type genericInterface : i.getClass().getGenericInterfaces()) { System.out.println(genericInterface.getTypeName()); } }
是不是感觉反射功能很强大?几乎类的所有信息都可以通过反射获得。
创建类对象 既然我们拿到了类的定义,那么是否可以通过Class对象来创建对象、调用方法、修改变量呢?当然是可以的,那我们首先来探讨一下如何创建一个类的对象:
1
2
3
4
5
6
7
8
9
10
11
public static void main (String[] args) throws InstantiationException, IllegalAccessException { Class<Student> clazz = Student.class; Student student = clazz.newInstance(); student.test(); } static class Student { public void test () { System.out.println("萨日朗" ); } }
通过使用newInstance()方法来创建对应类型的实例,返回泛型T,注意它会抛出InstantiationException和IllegalAccessException异常,那么什么情况下会出现异常呢?
1
2
3
4
5
6
7
8
9
10
11
12
13
14
15
16
public static void main (String[] args) throws InstantiationException, IllegalAccessException { Class<Student> clazz = Student.class; Student student = clazz.newInstance(); student.test(); } static class Student { public Student (String text) { } public void test () { System.out.println("萨日朗" ); } }
当类默认的构造方法被带参构造覆盖时,会出现InstantiationException异常,因为newInstance()只适用于默认无参构造。
1
2
3
4
5
6
7
8
9
10
11
12
13
14
public static void main (String[] args) throws InstantiationException, IllegalAccessException { Class<Student> clazz = Student.class; Student student = clazz.newInstance(); student.test(); } static class Student { private Student () {} public void test () { System.out.println("萨日朗" ); } }
当默认无参构造的权限不是public时,会出现IllegalAccessException异常,表示我们无权去调用默认构造方法。在JDK9之后,不再推荐使用newInstance()方法了,而是使用我们接下来要介绍到的,通过获取构造器,来实例化对象:
1
2
3
4
5
6
7
8
9
10
11
12
13
14
public static void main (String[] args) throws NoSuchMethodException, InvocationTargetException, InstantiationException, IllegalAccessException { Class<Student> clazz = Student.class; Student student = clazz.getConstructor(String.class).newInstance("what's up" ); student.test(); } static class Student { public Student (String str) {} public void test () { System.out.println("萨日朗" ); } }
通过获取类的构造方法(构造器)来创建对象实例,会更加合理,我们可以使用getConstructor()方法来获取类的构造方法,同时我们需要向其中填入参数,也就是构造方法需要的类型,当然我们这里只演示了。那么,当访问权限不是public的时候呢?
1
2
3
4
5
6
7
8
9
10
11
12
13
14
public static void main (String[] args) throws NoSuchMethodException, InvocationTargetException, InstantiationException, IllegalAccessException { Class<Student> clazz = Student.class; Student student = clazz.getConstructor(String.class).newInstance("what's up" ); student.test(); } static class Student { private Student (String str) {} public void test () { System.out.println("萨日朗" ); } }
我们发现,当访问权限不足时,会无法找到此构造方法,那么如何找到非public的构造方法呢?
1
2
3
4
5
Class<Student> clazz = Student.class; Constructor<Student> constructor = clazz.getDeclaredConstructor(String.class); constructor.setAccessible(true ); Student student = constructor.newInstance("what's up" );student.test();
使用getDeclaredConstructor()方法可以找到类中的非public构造方法,但是在使用之前,我们需要先修改访问权限,在修改访问权限之后,就可以使用非public方法了(这意味着,反射可以无视权限修饰符访问类的内容)
调用类方法 我们可以通过反射来调用类的方法(本质上还是类的实例进行调用)只是利用反射机制实现了方法的调用,我们在包下创建一个新的类:
1
2
3
4
5
6
7
package com.test;public class Student { public void test (String str) { System.out.println("萨日朗" +str); } }
这次我们通过forName(String)来找到这个类并创建一个新的对象:
1
2
3
4
5
6
7
public static void main (String[] args) throws ReflectiveOperationException { Class<?> clazz = Class.forName("com.test.Student" ); Object instance = clazz.newInstance(); Method method = clazz.getMethod("test" , String.class); method.invoke(instance, "what's up" ); }
通过调用getMethod()方法,我们可以获取到类中所有声明为public的方法,得到一个Method对象,我们可以通过Method对象的invoke()方法(返回值就是方法的返回值,因为这里是void,返回值为null)来调用已经获取到的方法,注意传参。
我们发现,利用反射之后,在一个对象从构造到方法调用,没有任何一处需要引用到对象的实际类型,我们也没有导入Student类,整个过程都是反射在代替进行操作,使得整个过程被模糊了,过多的使用反射,会极大地降低后期维护性。
同构造方法一样,当出现非public方法时,我们可以通过反射来无视权限修饰符,获取非public方法并调用,现在我们将test()方法的权限修饰符改为private:
1
2
3
4
5
6
7
8
public static void main (String[] args) throws ReflectiveOperationException { Class<?> clazz = Class.forName("com.test.Student" ); Object instance = clazz.newInstance(); Method method = clazz.getDeclaredMethod("test" , String.class); method.setAccessible(true ); method.invoke(instance, "what's up" ); }
Method和Constructor都和Class一样,他们存储了方法的信息,包括方法的形式参数列表,返回值,方法的名称等内容,我们可以直接通过Method对象来获取这些信息:
1
2
3
4
5
6
7
public static void main (String[] args) throws ReflectiveOperationException { Class<?> clazz = Class.forName("com.test.Student" ); Method method = clazz.getDeclaredMethod("test" , String.class); System.out.println(method.getName()); System.out.println(method.getReturnType()); }
当方法的参数为可变参数时,我们该如何获取方法呢?实际上,我们在之前就已经提到过,可变参数实际上就是一个数组,因此我们可以直接使用数组的class对象表示:
1 Method method = clazz.getDeclaredMethod("test" , String[].class);
反射非常强大,尤其是我们提到的越权访问,但是请一定谨慎使用,别人将某个方法设置为private一定有他的理由,如果实在是需要使用别人定义为private的方法,就必须确保这样做是安全的,在没有了解别人代码的整个过程就强行越权访问,可能会出现无法预知的错误。
修改类的属性 我们还可以通过反射访问一个类中定义的成员字段也可以修改一个类的对象中的成员字段值,通过getField()方法来获取一个类定义的指定字段:
1
2
3
4
5
6
7
8
9
10
public static void main (String[] args) throws ReflectiveOperationException { Class<?> clazz = Class.forName("com.test.Student" ); Object instance = clazz.newInstance(); Field field = clazz.getField("i" ); field.set(instance, 100 ); Method method = clazz.getMethod("test" ); method.invoke(instance); }
在得到Field之后,我们就可以直接通过set()方法为某个对象,设定此属性的值,比如上面,我们就为instance对象设定值为100,当访问private字段时,同样可以按照上面的操作进行越权访问:
1
2
3
4
5
6
7
8
9
10
11
public static void main (String[] args) throws ReflectiveOperationException { Class<?> clazz = Class.forName("com.test.Student" ); Object instance = clazz.newInstance(); Field field = clazz.getDeclaredField("i" ); field.setAccessible(true ); field.set(instance, 100 ); Method method = clazz.getMethod("test" ); method.invoke(instance); }
现在我们已经知道,反射几乎可以把一个类的老底都给扒出来,任何属性,任何内容,都可以被反射修改,无论权限修饰符是什么,那么,如果我的字段被标记为final呢?现在在字段i前面添加final关键字,我们再来看看效果:
1 private final int i = 10 ;
这时,当字段为final时,就修改失败了!当然,通过反射可以直接将final修饰符直接去除,去除后,就可以随意修改内容了,我们来尝试修改Integer的value值:
1
2
3
4
5
6
7
8
9
10
11
12
13
14
public static void main (String[] args) throws ReflectiveOperationException { Integer i = 10 ; Field field = Integer.class.getDeclaredField("value" ); Field modifiersField = Field.class.getDeclaredField("modifiers" ); modifiersField.setAccessible(true ); modifiersField.setInt(field,field.getModifiers()&~Modifier.FINAL); field.setAccessible(true ); field.set(i, 100 ); System.out.println(i); }
我们可以发现,反射非常暴力,就连被定义为final字段的值都能强行修改,几乎能够无视一切阻拦。我们来试试看修改一些其他的类型:
1
2
3
4
5
6
7
8
9
10
11
public static void main (String[] args) throws ReflectiveOperationException { List<String> i = new ArrayList <>(); Field field = ArrayList.class.getDeclaredField("size" ); field.setAccessible(true ); field.set(i, 10 ); i.add("测试" ); System.out.println(i.size()); i.remove(10 ); }
实际上,整个ArrayList体系由于我们的反射操作,导致被破坏,因此它已经无法正常工作了!
再次强调,在进行反射操作时,必须注意是否安全,虽然拥有了创世主的能力,但是我们不能滥用,我们只能把它当做一个不得已才去使用的工具!
类加载器 我们接着来介绍一下类加载器,实际上类加载器就是用于加载一个类的,但是类加载器并不是只有一个。
思考: 既然说Class对象和加载的类唯一对应,那如果我们手动创建一个与JDK包名一样,同时类名也保持一致,JVM会加载这个类吗?
1
2
3
4
5
6
7
package java.lang;public class String { public static void main (String[] args) { System.out.println("我姓🐴,我叫🐴nb" ); } }
我们发现,会出现以下报错:
1
2
错误: 在类 java.lang.String 中找不到 main 方法, 请将 main 方法定义为: public static void main (String[] args)
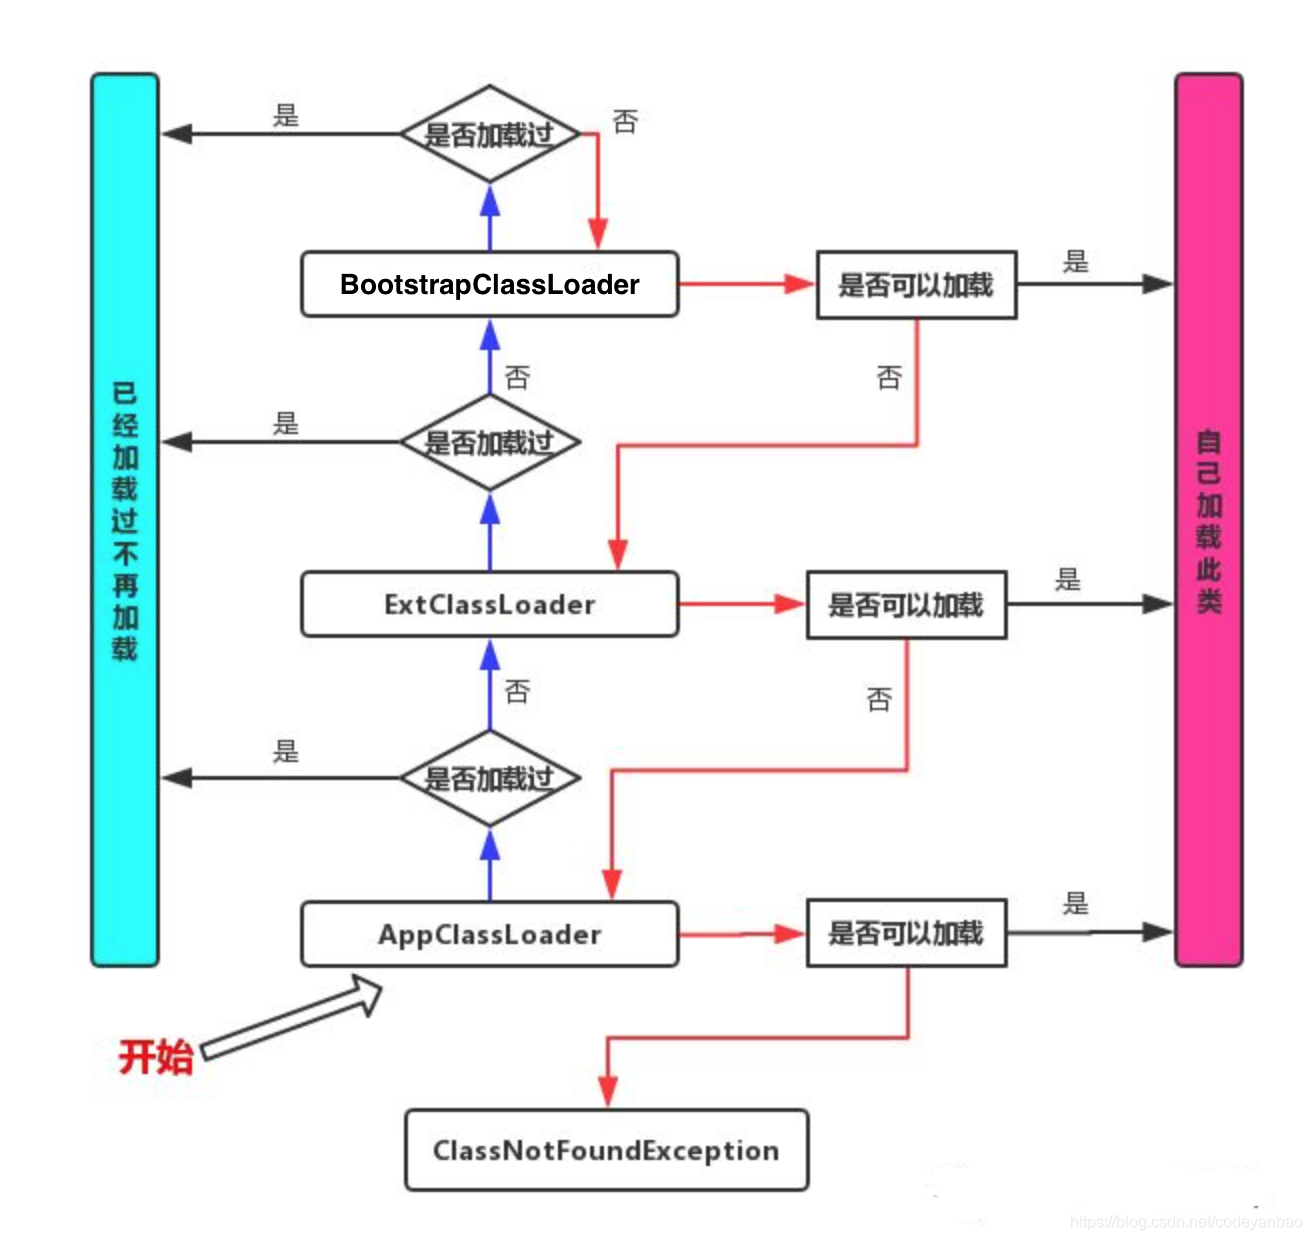
但是我们明明在自己写的String类中定义了main方法啊,为什么会找不到此方法呢?实际上这是ClassLoader的双亲委派机制在保护Java程序的正常运行:
实际上类最开始是由BootstarpClassLoader进行加载,BootstarpClassLoader用于加载JDK提供的类,而我们自己编写的类实际上是AppClassLoader加载的,只有BootstarpClassLoader都没有加载的类,才会让AppClassLoader来加载,因此我们自己编写的同名包同名类不会被加载,而实际要去启动的是真正的String类,也就自然找不到main方法了。
1
2
3
4
5
6
7
8
public class Main { public static void main (String[] args) { System.out.println(Main.class.getClassLoader()); System.out.println(Main.class.getClassLoader().getParent()); System.out.println(Main.class.getClassLoader().getParent().getParent()); System.out.println(String.class.getClassLoader()); } }
由于BootstarpClassLoader是C++编写的,我们在Java中是获取不到的。
既然通过ClassLoader就可以加载类,那么我们可以自己手动将class文件加载到JVM中吗?先写好我们定义的类:
1
2
3
4
5
6
7
8
9
package com.test;public class Test { public String text; public void test (String str) { System.out.println(text+" > 我是测试方法!" +str); } }
通过javac命令,手动编译一个.class文件:
1 nagocoler@NagodeMacBook -Pro HelloWorld % javac src/main/java/com/test/Test.java
编译后,得到一个class文件,我们把它放到根目录下,然后编写一个我们自己的ClassLoader,因为普通的ClassLoader无法加载二进制文件,因此我们编写一个自定义的来让它支持:
1 2 3 4 5 6 7 8 9 10 11 12 13 14 15 static class MyClassLoader extends ClassLoader { public Class<?> defineClass(String name, byte [] b){ return defineClass(name, b, 0 , b.length); } } public static void main (String[] args) throws IOException { MyClassLoader classLoader = new MyClassLoader (); FileInputStream stream = new FileInputStream ("Test.class" ); byte [] bytes = new byte [stream.available()]; stream.read(bytes); Class<?> clazz = classLoader.defineClass("com.test.Test" , bytes); System.out.println(clazz.getName()); }
现在,我们就将此class文件读取并解析为Class了,现在我们就可以对此类进行操作了(注意,我们无法在代码中直接使用此类型,因为它是我们直接加载的),我们来试试看创建一个此类的对象并调用其方法:
1
2
3
4
5
6
7
try { Object obj = clazz.newInstance(); Method method = clazz.getMethod("test" , String.class); method.invoke(obj, "哥们这瓜多少钱一斤?" ); }catch (Exception e){ e.printStackTrace(); }
我们来试试看修改成员字段之后,再来调用此方法:
1
2
3
4
5
6
7
8
9
try { Object obj = clazz.newInstance(); Field field = clazz.getField("text" ); field.set(obj, "华强" ); Method method = clazz.getMethod("test" , String.class); method.invoke(obj, "哥们这瓜多少钱一斤?" ); }catch (Exception e){ e.printStackTrace(); }
通过这种方式,我们就可以实现外部加载甚至是网络加载一个类,只需要把类文件传递即可,这样就无需再将代码写在本地,而是动态进行传递,不仅可以一定程度上防止源代码被反编译(只是一定程度上,想破解你代码有的是方法),而且在更多情况下,我们还可以对byte[]进行加密,保证在传输过程中的安全性。
注解 注意: 注解跟我们之前讲解的注释完全不是一个概念,不要搞混了。
其实我们在之前就接触到注解了,比如@Override表示重写父类方法(当然不加效果也是一样的,此注解在编译时会被自动丢弃)注解本质上也是一个类,只不过它的用法比较特殊。
注解可以被标注在任意地方,包括方法上、类名上、参数上、成员属性上、注解定义上等,就像注释一样,它相当于我们对某样东西的一个标记。而与注释不同的是,注解可以通过反射在运行时获取,注解也可以选择是否保留到运行时。
预设注解 JDK预设了以下注解,作用于代码:
元注解 元注解是作用于注解上的注解,用于我们编写自定义的注解:
看了这么多预设的注解,你们肯定眼花缭乱了,那我们来看看@Override是如何定义的:
1
2
3
4
@Target(ElementType.METHOD) @Retention(RetentionPolicy.SOURCE) public @interface Override {}
该注解由@Target限定为只能作用于方法上,ElementType是一个枚举类型,用于表示此枚举的作用域,一个注解可以有很多个作用域。@Retention表示此注解的保留策略,包括三种策略,在上述中有写到,而这里定义为只在代码中。一般情况下,自定义的注解需要定义1个@Retention和1-n个@Target。
既然了解了元注解的使用和注解的定义方式,我们就来尝试定义一个自己的注解:
1
2
3
4
@Target(ElementType.METHOD) @Retention(RetentionPolicy.RUNTIME) public @interface Test {}
这里我们定义一个Test注解,并将其保留到运行时,同时此注解可以作用于方法或是类上:
1
2
3
4
5
6
7
@Test public class Main { @Test public static void main (String[] args) { } }
这样,一个最简单的注解就被我们创建了。
注解的使用 我们还可以在注解中定义一些属性,注解的属性也叫做成员变量,注解只有成员变量,没有方法。注解的成员变量在注解的定义中以“无形参的方法”形式来声明,其方法名定义了该成员变量的名字,其返回值定义了该成员变量的类型:
1
2
3
4
5
@Target({ElementType.METHOD, ElementType.TYPE}) @Retention(RetentionPolicy.RUNTIME) public @interface Test { String value () ; }
默认只有一个属性时,我们可以将其名字设定为value,否则,我们需要在使用时手动指定注解的属性名称,使用value则无需填入:
1
2
3
4
5
@Target({ElementType.METHOD, ElementType.TYPE}) @Retention(RetentionPolicy.RUNTIME) public @interface Test { String test () ; }
1
2
3
4
5
6
public class Main { @Test(test = "") public static void main (String[] args) { } }
我们也可以使用default关键字来为这些属性指定默认值:
1
2
3
4
5
@Target({ElementType.METHOD, ElementType.TYPE}) @Retention(RetentionPolicy.RUNTIME) public @interface Test { String value () default "都看到这里了,给个三连吧!" ; }
当属性存在默认值时,使用注解的时候可以不用传入属性值。当属性为数组时呢?
1
2
3
4
5
@Target({ElementType.METHOD, ElementType.TYPE}) @Retention(RetentionPolicy.RUNTIME) public @interface Test { String[] value(); }
当属性为数组,我们在使用注解传参时,如果数组里面只有一个内容,我们可以直接传入一个值,而不是创建一个数组:
1
2
3
4
@Test("关注点了吗") public static void main (String[] args) { }
1
2
3
4
5
6
public class Main { @Test({"value1", "value2"}) public static void main (String[] args) { } }
反射获取注解 既然我们的注解可以保留到运行时,那么我们来看看,如何获取我们编写的注解,我们需要用到反射机制:
1
2
3
4
5
6
7
8
9
public static void main (String[] args) { Class<Student> clazz = Student.class; for (Annotation annotation : clazz.getAnnotations()) { System.out.println(annotation.annotationType()); System.out.println(annotation instanceof Test); Test test = (Test) annotation; System.out.println(test.value()); } }
通过反射机制,我们可以快速获取到我们标记的注解,同时还能获取到注解中填入的值,那么我们来看看,方法上的标记是不是也可以通过这种方式获取注解:
1
2
3
4
5
6
7
8
9
public static void main (String[] args) throws NoSuchMethodException { Class<Student> clazz = Student.class; for (Annotation annotation : clazz.getMethod("test" ).getAnnotations()) { System.out.println(annotation.annotationType()); System.out.println(annotation instanceof Test); Test test = (Test) annotation; System.out.println(test.value()); } }
无论是方法、类、还是字段,都可以使用getAnnotations()方法(还有几个同名的)来快速获取我们标记的注解。
所以说呢,这玩意学来有啥用?丝毫get不到这玩意的用处。其实不是,现阶段作为初学者,还体会不到注解带来的快乐,在接触到Spring和SpringBoot等大型框架后,相信各位就能感受到注解带来的魅力了。
结束语 Java的学习对你来说可能是枯燥的,可能是漫长的,也有可能是有趣的,无论如何,你终于是完成了全部内容的学习,可喜可贺。
实际上很多人一开始跟着你们一起在进行学习,但是他们因为各种原因,最后还是没有走完这条路。坚持不一定会成功,但坚持到别人坚持不下去,那么你至少已经成功了一半了,坚持到最后的人运气往往都不会太差。
希望各位小伙伴能够在之后的学习中砥砺前行!

